この記事では『Angularの単体テスト(ユニットテスト)』について
- Angularの単体テストで使うJasmineとKarma
- Angularの単体テスト(ユニットテスト)の方法
などを分かりやすく説明するように心掛けています。ご参考になれば幸いです。
Angularの単体テストで使うJasmineとKarma
Angular CLIの「ng newコマンド」で作成したプロジェクトには、デフォルトで単体テスト(ユニットテスト)の環境が整っており、「ng testコマンド」や「npm run testコマンド」を実行すると、単体テストを実行できるようになっています。
この単体テストには、Jasmine(ジャスミン)というテストフレームワークとKarma(カルマ)というテストランナーが使われています。
- Jasmine
- 単体テストのためのフレームワークです。
- Jasmineの構文でテスト内容を記述し、テストが期待通りに機能しているか確認するために使用します。期待する結果と実際の結果を比較して、テストが成功したか失敗したかを判断します。
- 後ほど詳しく説明しますが、Jasmineのdescribe関数はテストスイートを定義するために使用し、it関数はテストケースを定義するために使用し、expect関数はプログラムが期待するとおりに動作しているかをチェックするために使用します。
- Karma
- テストコードをブラウザ上で実行するためのテストランナーです。
- テストコードの実行結果をコンソールに表示し、テストが正常に動作しているかを確認します。
また、Angular CLIの「ngコマンド」を実行して、コンポーネントやサービスを作成すると、「○○.spec.ts」というテストファイルがデフォルトで生成されます。
このテストファイルでは、Jasmineの「describe関数」、「it関数」、「expect関数」などを用いてテスト内容を記述します。記述したテストコードは、Karmaというテストランナーによってブラウザ上で実行されます。そして、テスト結果は、コンソール上やブラウザ上に表示されます。
Angularの単体テスト(ユニットテスト)の方法
単体テスト(ユニットテスト)を行うための手順を以下に示します。
単体テスト(ユニットテスト)を行うための手順
- テストに必要なファイルを用意する
- 「ng test」コマンドでテストを実行する
- テストの結果を確認する
- カバレッジを確認する
上記の手順について順番に説明します。
テストに必要なファイルを用意する
ディレクトリ構成を以下に示します。★マークで示したファイルを作成する必要があります。
Counter-app
├─src
│   ├─app
│   │   ├─app.module.ts
│   │   ├─app.component.ts★
│   │   └─app.component.spec.ts★
│   ├─main.ts
│   ├─index.html
│   └─styles.css
├─angular.json
├─package-lock.json
├─package.json
├─tsconfig.app.json
├─tsconfig.json
├─tsconfig.spec.json
└─node_modules「app.component.spec.ts」に「app.component.ts」の単体テストを実行するためのテストコードを記述します。これらのファイルは同じフォルダに置きます。また、ファイル名(app.componentの部分)は双方のファイルで同じにします。
「app.component.ts」のプログラム例を以下に示します。
app.component.ts
import { Component } from '@angular/core';

@Component({
  selector: 'app-root',
  template: `<h1>Hello, {{title}}</h1>`,
})
export class AppComponent {
  title = 'Angular!'

  addNumbers(a: number, b: number): number {
    return a + b;
  }
}「AppComponent(app.component.ts)」では、titleプロパティに「Angular!」という文字列を格納し、そのtitleプロパティをAngularのインターポレーション(補間)を用いて、h1要素に埋め込んでいます。また、第1引数と第2引数に渡された値を足し算するaddNumberメソッドを定義しています。
この「AppComponent(app.component.ts)」において、
- AppComponentのインスタンスが作成されているか
- titleプロパティに「Angular!」という文字列が格納されているか
- addNumberメソッドが期待通りの結果を返すか
- h1要素のテキストが「Hello, Angular!」であるか
をテストするための、「テストファイル(app.component.spec.ts)」を以下に示します。
app.component.spec.ts
import { TestBed, ComponentFixture } from '@angular/core/testing';
import { DebugElement } from '@angular/core';
import { AppComponent } from './app.component';

describe('AppComponent', () => {
  beforeEach(() => {
    TestBed.configureTestingModule({
      declarations: [AppComponent],   // AppComponentが依存しているコンポーネントがあれば記述する
      providers: [],                  // AppComponentが依存しているサービスがあれば記述する
      imports: []                     // AppComponentが依存しているモジュールがあれば記述する
    });
  });

  // AppComponentのインスタンスが作成されているかを確認するテスト
  it('AppComponentのインスタンスが作成されているか', () => {
    const fixture: ComponentFixture<AppComponent> = TestBed.createComponent(AppComponent);
    const component: AppComponent = fixture.componentInstance;
    expect(component).toBeTruthy();
  });

  // titleプロパティに「Angular!」という文字列が格納されているかを確認するテスト
  it(`titleプロパティに「Angular!」という文字列が格納されているか`, () => {
    const fixture: ComponentFixture<AppComponent> = TestBed.createComponent(AppComponent);
    const component: AppComponent = fixture.componentInstance;
    expect(component.title).toEqual('Angular!');
  });

  // addNumberメソッドが期待通りの結果を返すかを確認するテスト
  it('addNumberメソッドが期待通りの結果を返すか', () => {
    const fixture: ComponentFixture<AppComponent> = TestBed.createComponent(AppComponent);
    const component: AppComponent = fixture.componentInstance;
    expect(component.addNumbers(1, 2)).toEqual(3);
  });

  // h1要素のテキストが「Hello, Angular!」であるかを確認するテスト
  it('h1要素のテキストが「Hello, Angular!」であるか', () => {
    const fixture: ComponentFixture<AppComponent> = TestBed.createComponent(AppComponent);
    const AppDe: DebugElement = fixture.debugElement;
    const AppEl: HTMLElement = AppDe.nativeElement;
    fixture.detectChanges();
    const h1 = AppEl.querySelector('h1')!;
    expect(h1.textContent).toEqual('Hello, Angular!');
  });
});上で示した「テストファイル(app.component.spec.ts)」を見ながら、Jasmineの構文を説明します。
import文
import { TestBed, ComponentFixture } from '@angular/core/testing';
import { DebugElement } from '@angular/core';
import { AppComponent } from './app.component';上記の箇所では、Angularテストに必要なTestBedとComponentFixtureを@angular/core/testingモジュールからインポートしています。また、DebugElementを@angular/core/testing モジュールからインポートしています。加えて、テスト対象のAppComponentを「app.component.tsファイル」からインポートしています。
- TestBed
- Angularのテストユーティリティの一部であり、テストを行う際に役立つメソッド(後ほど説明するconfigureTestingModuleやcreateComponent)などを提供しています。
- ComponentFixture
- テスト中に作成されたコンポーネントやそのテンプレートをラップするクラスです。
- DebugElement
- テンプレート内のDOM要素を検査したり操作したりするためのメソッドやプロパティを提供しています。
describe関数
describe('AppComponent', () => {
  	・・・
});describe関数を使用して、テストしたいコンポーネント(ここでは、AppComponent)に対するテストスイート(関連する一連のテストをグループ化したもの)を定義します。
describe関数の第1引数には、テストスイートの名前を記述します。コンポーネント名やファイル名などを記述することが多いです。
describe関数の第2引数には、関数を記述します。この関数の中に各単体テストをit関数で記述します。
beforeEach関数
beforeEach(() => {
  TestBed.configureTestingModule({
    declarations: [AppComponent],   // AppComponentが依存しているコンポーネントがあれば記述する
    providers: [],                  // AppComponentが依存しているサービスがあれば記述する
    imports: []                     // AppComponentが依存しているモジュールがあれば記述する
  });
});beforeEach関数は各単体テストが実行される前に実行される関数です(なお、テストの終了後に実行する関数はafterEach関数です)。
上記の箇所で使用しているメソッドについて説明します。
- TestBedのconfigureTestingModuleメソッド
- テストに必要なコンポーネントやサービスのみを含む「テストモジュール」を設定するためのメソッドです。
declarationsプロパティには、テスト対象のコンポーネントや、テスト対象のコンポーネントが依存しているコンポーネントを記述します。providersプロパティにはテスト対象のコンポーネントが依存しているサービスを記述します。importsプロパティにはテスト対象のコンポーネントが依存しているモジュールを記述します。
it関数
 // AppComponentのインスタンスが作成されているかを確認するテスト
it('AppComponentのインスタンスが作成されているか', () => {
  const fixture: ComponentFixture<AppComponent> = TestBed.createComponent(AppComponent);
  const component: AppComponent = fixture.componentInstance;
  expect(component).toBeTruthy();
});

// titleプロパティに「Angular!」という文字列が格納されているかを確認するテスト
it(`titleプロパティに「Angular!」という文字列が格納されているか`, () => {
  const fixture: ComponentFixture<AppComponent> = TestBed.createComponent(AppComponent);
  const component: AppComponent = fixture.componentInstance;
  expect(component.title).toEqual('Angular!');
});

// addNumberメソッドが期待通りの結果を返すかを確認するテスト
it('addNumberメソッドが期待通りの結果を返すか', () => {
  const fixture: ComponentFixture<AppComponent> = TestBed.createComponent(AppComponent);
  const component: AppComponent = fixture.componentInstance;
  expect(component.addNumbers(1, 2)).toEqual(3);
});

// h1要素のテキストが「Hello, Angular!」であるかを確認するテスト
it('h1要素のテキストが「Hello, Angular!」であるか', () => {
  const fixture: ComponentFixture<AppComponent> = TestBed.createComponent(AppComponent);
  const AppDe: DebugElement = fixture.debugElement;
  const AppEl: HTMLElement = AppDe.nativeElement;
  fixture.detectChanges();  // Update the DOM
  const h1 = AppEl.querySelector('h1')!;
  expect(h1.textContent).toEqual('Hello, Angular!');
});it関数を使用して各単体テストを定義します。
it関数の第1引数には、期待される結果を記述します。
it関数の第2引数には、関数を記述します。この関数の中にテストで行う処理と期待される結果を記述します。
上記の箇所で使用しているメソッドやプロパティについて説明します。
- TestBedのcreateComponentメソッド
- 指定したコンポーネントをラップする
ComponentFixtureインスタンスを生成して、それを返すメソッドです。 - 上記のプログラムでは、「
TestBed.createComponent(AppComponent)」と記述することで、「AppComponentをラップしているComponentFixtureインスタンス」を返しています。ここで取得したComponentFixtureインスタンスはfixtureという変数に代入しています。 - 後ほど説明しますが、
ComponentFixtureインスタンスは「コンポーネントのインスタンスにアクセスするcomponentInstanceプロパティ」や「コンポーネントのホスト要素にアクセスするためのnativeElementプロパティやdebugElementプロパティ」などを持っています。
- 指定したコンポーネントをラップする
- ComponentFixtureのcomponentInstanceプロパティ
ComponentFixtureインスタンスがラップしているコンポーネントのインスタンスを参照します。- 上記のプログラムでは、「
ComponentFixtureインスタンス(ここでは、fixture)」がラップしている「コンポーネント(ここでは、AppComponent)」のインスタンスを参照し、それをcomponentという変数に代入しています。その結果、componentを通して、テストケースの中で「コンポーネント(ここでは、AppComponent)」のインスタンスのプロパティやメソッドに直接アクセスできるようになります。
- ComponentFixtureのdebugElementプロパティ
ComponentFixtureインスタンスがラップしているコンポーネントのホスト要素に対応するDebugElementを取得しています。- 上記のプログラムでは、「
ComponentFixtureインスタンス(ここでは、fixture)」がラップしている「コンポーネント(ここでは、AppComponent)」のホスト要素に対応するDebugElementを取得し、それをAppDeという変数に代入しています。
- ComponentFixtureのdetectChangesメソッド
- コンポーネントのプロパティの変更等をAngularに通知します。これによりコンポーネントのテンプレートが更新され値が反映されます。
- DebugElementのnativeElementプロパティ
- コンポーネントのホスト要素を取得しています。
- 上記のプログラムでは、「コンポーネント(ここでは、
AppComponent)」のホスト要素を取得し、それをAppElという変数に代入しています。 - 今回作成した「app.component.ts」の場合、
selectorプロパティに「app-root」と指定しているので、コンポーネントのホスト要素はHTML内の<app-root>要素になります。
- HTMLElementのquerySelectorメソッド
- h1要素を検索し、
h1という変数に代入しています。後ろの感嘆符(!)はTypeScriptの非nullアサーション演算子で、AppEl.querySelector('h1')がnullではないことを示しています。
- h1要素を検索し、
expectとMatcher
テストで行う処理と期待される結果は「expect」と「Matcher」を組み合わせて記述します。
以下の形式で記述します。
expect(実際値).Matcher(期待値)例えば、「toBeTruthy()」や「toEqual()」のようなMatcherを用いた場合、以下のようになります。
expect(component).toBeTruthy();上記のプログラムは、componentがtruthyの場合(今回のテストの場合、AppComponentインスタンスが作成されている場合)にテストが合格します。何らかのエラーが発生してAppComponentコンポーネントが正しくインスタンス化されていない場合にはこのテストは失敗します。
expect(component.title).toEqual('Angular!');上記のプログラムは、component.titleの文字列が「'Angular!'」の場合(今回のテストの場合、AppComponentインスタンスのtitleプロパティの文字列が「'Angular!'」の場合)にテストが合格します。
expect(component.addNumbers(1, 2)).toEqual(3);上記のプログラムは、component.addNumbers(1, 2)の結果が「3」の場合(今回のテストの場合、AppComponentインスタンスのaddNumbersメソッドの引数に「1」と「2」を渡し、その結果が「3」の場合)にテストが合格します。
【補足】否定形も使える
否定形を使う場合は「not.Matcher(期待値)」とします。例えば、「toBeTruthy()」や「toEqual()」のようなMatcherを用いた場合、以下のようになります。
expect(component).not.toBeTruthy();上記のプログラムは、componentがtruthyではない場合(今回のテストの場合、AppComponentインスタンスが作成されていない場合)にテストが合格します。
expect(component.title).not.toEqual('Angular!');上記のプログラムは、component.titleの文字列が「'Angular!'」ではない場合(今回のテストの場合、AppComponentインスタンスのtitleプロパティの文字列が「'Angular!'」ではない場合)にテストが合格します。
expect(component.addNumbers(1, 2)).not.toEqual(3);上記のプログラムは、component.addNumbers(1, 2)の結果が「3」ではない場合(今回のテストの場合、AppComponentインスタンスのaddNumbersメソッドの引数に「1」と「2」を渡し、その結果が「3」ではない場合)にテストが合格します。
【補足】スキップしたいテストがある場合
スキップしたいテストには、describe関数やit関数の前に「x」を付けて、「xdescribe」や「xit」と記述します。
「xdescribe」と記述すると、そのテストスイートがスキップされ、「xit」と記述すると、そのテストがスキップされます。なお、「x」は「exclude(除外)」を意味しています。
逆に、このテストのみを実行したい場合には、describe関数やit関数の前に「f」を付けて、「fdescribe」や「fit」と記述します。
「fdescribe」と記述すると、そのテストスイートのみが実行され、「fit」と記述すると、そのテストのみが実行されます。なお、「f」は「f(焦点)」を意味しています。
HTML要素には様々な取得方法
なお、HTML要素には様々な取得方法があります。
今回は、AppComponentのh1要素を取得する様々な方法を以下に示します。
方法1
const fixture: ComponentFixture<AppComponent> = TestBed.createComponent(AppComponent);
const AppDe: DebugElement = fixture.debugElement;
const AppEl: HTMLElement = AppDe.nativeElement;
const h1 = AppEl.querySelector('h1')!;
Angularの公式ページで推奨されている方法です。
方法2
const fixture: ComponentFixture<AppComponent> = TestBed.createComponent(AppComponent);
const AppEl: HTMLElement = fixture.nativeElement;
const h1 = AppEl.querySelector('h1')!;DebugElementを介さなくても、ComponentFixtureのnativeElementプロパティを用いれば、直接ホスト要素を取得することができます。
方法3
const fixture: ComponentFixture<AppComponent> = TestBed.createComponent(AppComponent);
const AppDe: DebugElement = fixture.debugElement;
const h1De: DebugElement = AppDe.query(By.css('h1'));
const h1 = HTMLElement = h1De.nativeElement;querySelectorメソッドが使えない場合には、この書き方をします。queryメソッドはDebugElemetを返します。この方法を用いる場合には、以下に示すようにByをインストールする必要があります。
import { By } from '@angular/platform-browser';ComponentFixtureの主なプロパティとメソッド
ComponentFixtureの主なプロパティとメソッドを以下にまとめます。
ComponentFixtureの主なプロパティとメソッド
- componentInstanceプロパティ
- ComponentFixtureがラップしているコンポーネントのインスタンスを参照している。
- debugElementプロパティ
- ComponentFixtureがラップしているコンポーネントのホスト要素に対応するDebugElementを参照している。DebugElementは、テンプレート内のDOM要素を検査したり操作したりするためのメソッドを持っています。
- nativeElementプロパティ
- ComponentFixtureがラップしているコンポーネントのホスト要素を参照している。今回作成した「app.component.ts」の場合、コンポーネントのホスト要素はHTML内の要素になります。
- detectChangesメソッド
- コンポーネントのプロパティの変更等をAngularに通知し、テンプレートを更新して値を反映させます。
「ng test」コマンドでテストを実行する
カレントディレクトリ(現在作業しているディレクトリ)がプロジェクトのルートディレクトリであることを確認してください。その後、以下のコマンドを実行すると、テストをすることができます。
ng test
# 以下のコマンドでもテストが可能です。
npm run test
npm test
テストの結果を確認する
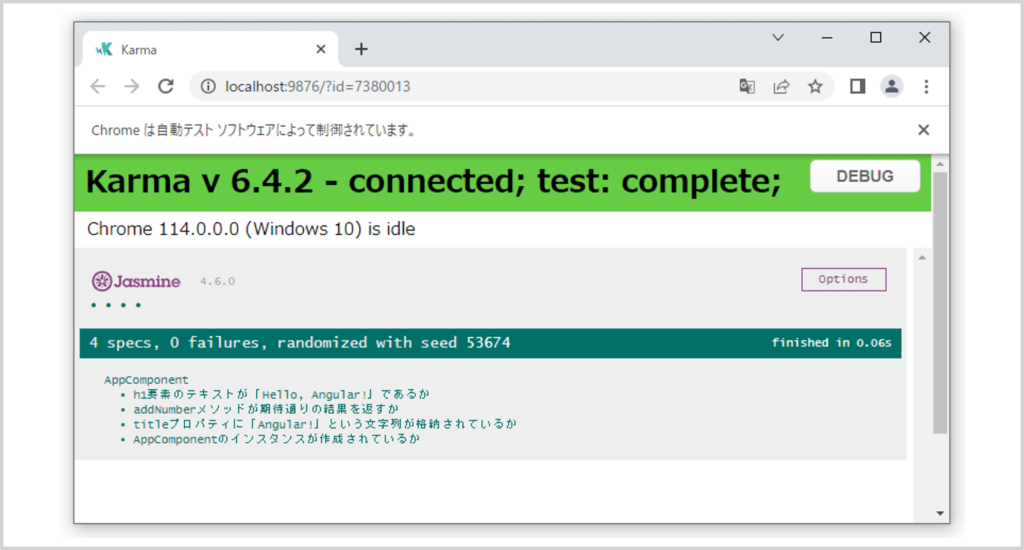
「ng test」コマンドを実行すると、以下に示すように、テストの実行結果がブラウザ上に表示されます。
また、「ng test」コマンドを実行後、コンソールの実行結果は以下のようになります(下記の実行結果は環境によって異なります)。
PS C:\Users\user01\Desktop\test\test-app> ng test
✔ Browser application bundle generation complete.
⠋ Generating browser application bundles...23 06 2023 14:14:33.588:WARN [karma]: No captured browser, open http://localhost:9876/
23 06 2023 14:14:33.608:INFO [karma-server]: Karma v6.4.2 server started at http://localhost:9876/
23 06 2023 14:14:33.608:INFO [launcher]: Launching browsers Chrome with concurrency unlimited
23 06 2023 14:14:33.612:INFO [launcher]: Starting browser Chrome
✔ Browser application bundle generation complete.
23 06 2023 14:14:34.399:INFO [Chrome 114.0.0.0 (Windows 10)]: Connected on socket mmHZAB0lXEKT91SAAAAB with id 61512971
Chrome 114.0.0.0 (Windows 10): Executed 4 of 4 SUCCESS (0.118 secs / 0.039 secs)
TOTAL: 4 SUCCESSログの最後の行に書いてある「Executed 4 of 4 SUCCESS」はKarmaが4つのテストを実行し、すべて合格したことを示しています。
また、「ng test」コマンドは変更を監視しています。そのため、「app.component.ts」や「app.component.spec.ts」を修正して保存すると、テストが再び実行され、ブラウザが更新されます。そして、新しいテストの結果が表示されます。
カバレッジを確認する
カレントディレクトリ(現在作業しているディレクトリ)がプロジェクトのルートディレクトリであることを確認してください。その後、以下のコマンドを実行すると、カバレッジレポートを生成することができます。
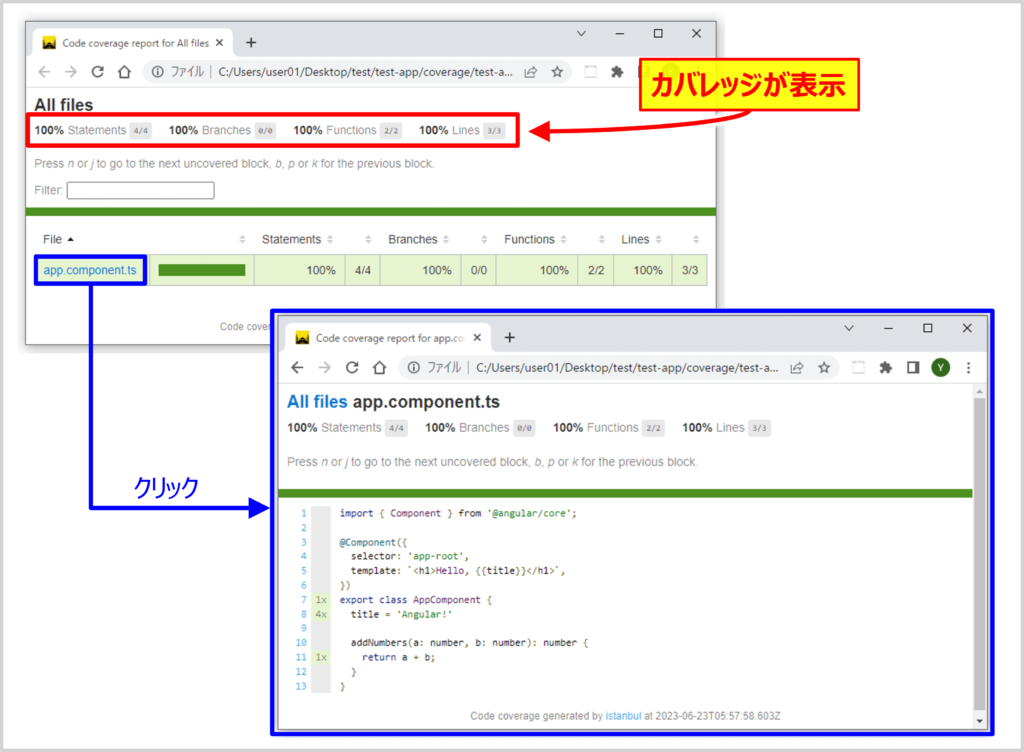
ng test --no-watch --code-coverageテストが完了すると、プロジェクトフォルダ内に「coverageディレクトリ」が生成されます。そのディレクトリの中にある「index.html」ファイルを開くと、以下に示すように、ソースコードとカバレッジを確認することができます。
補足
テストするたびにコードカバレッジレポートを作成したい場合は、Angular CLIの設定ファイル(angular.json)で次のようなオプションを設定してください。
"test": {
  "options": {
    "codeCoverage": true
  }
}
【補足】リファクタリング
it関数で多くのテストを行う場合、各テストにおいて、以下のプログラムの箇所を毎回記述するのは大変です。
const fixture: ComponentFixture<AppComponent> = TestBed.createComponent(AppComponent);
const component: AppComponent = fixture.componentInstance;
const AppDe: DebugElement = fixture.debugElement;
const AppEl: HTMLElement = AppDe.nativeElement;この場合、以下に示すように、beforeEach関数に宣言した方が見やすくなります。
import { TestBed, ComponentFixture } from '@angular/core/testing';
import { DebugElement } from '@angular/core';
import { AppComponent } from './app.component';

describe('AppComponent', () => {
  let fixture: ComponentFixture<AppComponent>;
  let component: AppComponent;
  let AppDe: DebugElement;
  let AppEl: HTMLElement;

  beforeEach(() => {
    TestBed.configureTestingModule({
      declarations: [AppComponent],   // AppComponentが依存しているコンポーネントがあれば記述する
      providers: [],                  // AppComponentが依存しているサービスがあれば記述する
      imports: []                     // AppComponentが依存しているモジュールがあれば記述する
    });
    fixture = TestBed.createComponent(AppComponent);
    component = fixture.componentInstance;
    AppDe = fixture.debugElement;
    AppEl = AppDe.nativeElement;
  });

  // AppComponentのインスタンスが作成されているかを確認するテスト
  it('AppComponentのインスタンスが作成されているか', () => {
    expect(component).toBeTruthy();
  });

  // titleプロパティに「Angular!」という文字列が格納されているかを確認するテスト
  it(`titleプロパティに「Angular!」という文字列が格納されているか`, () => {
    expect(component.title).toEqual('Angular!');
  });

  // addNumberメソッドが期待通りの結果を返すかを確認するテスト
  it('addNumberメソッドが期待通りの結果を返すか', () => {
    expect(component.addNumbers(1, 2)).toEqual(3);
  });

  // h1要素のテキストが「Hello, Angular!」であるかを確認するテスト
  it('h1要素のテキストが「Hello, Angular!」であるか', () => {
    fixture.detectChanges();
    const h1 = AppEl.querySelector('h1')!;
    expect(h1.textContent).toEqual('Hello, Angular!');
  });
});
本記事のまとめ
この記事では『Angularの単体テスト(ユニットテスト)』について、以下の内容を説明しました。
- Angularの単体テストで使うJasmineとKarma
- Angularの単体テスト(ユニットテスト)の方法
お読み頂きありがとうございました。